Bubble.io
If your application is created in Bubble, you can use DolphinCSV's Bubble plugin to save imported data into your Data Type.
A Bubble integration is only available with a paid Bubble account, even when testing. This is because the integration relies on Bubble's Data API, and the Data API is only available to paying users, even if your application has not been deployed yet.
Steps to integrate
1. Define where you want to save imported data
In Bubble, data is saved inside Data Types. To save the data your users have imported, you need to define a Data Type to hold that data. You can do that in the Data page (found in the left sidebar menu).
2. Enable the Data API in your Bubble application
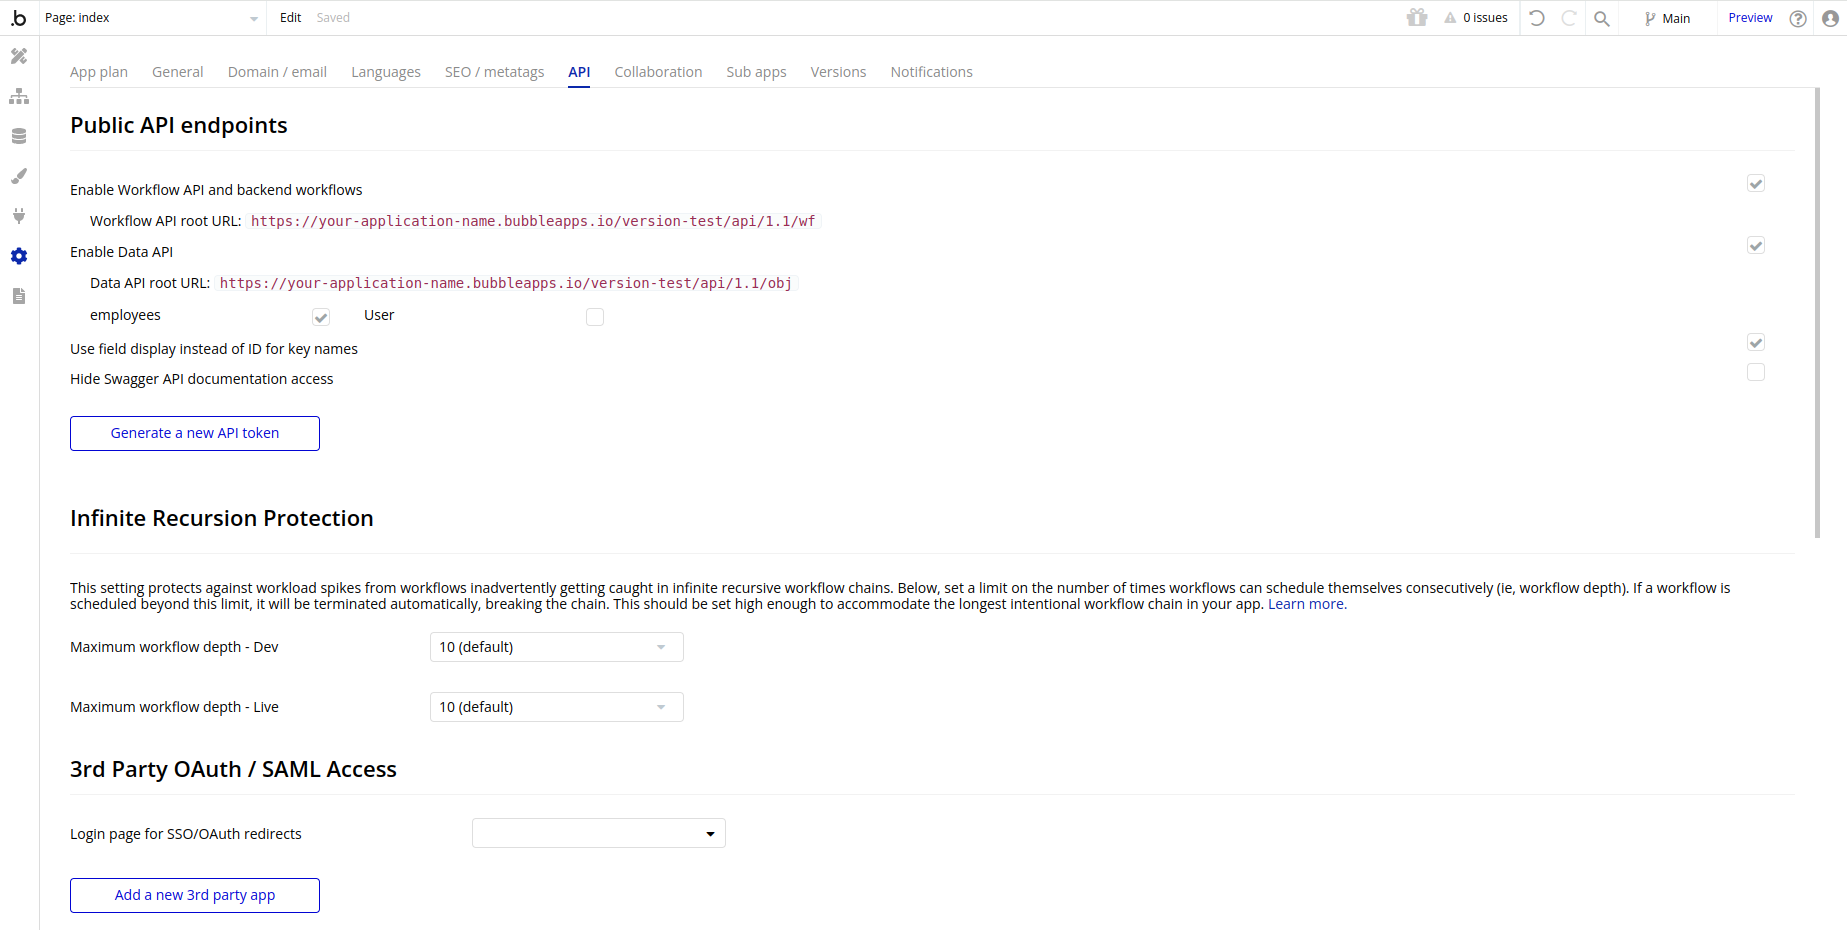
Once you have defined your Data Type, go to your Bubble application and go to settings, then API.

Make sure Enable Data API is checked, and that the Data Type you want to save imported data into is checked. This allows 3rd party applications using the Data API to manipulate that Data Type.
If you are a free Bubble user, even if you are able to turn on the Enable Data API option, the API will not be accessible to third parties, and the integration will still fail. Upgrade to a paid plan to ensure the Data API is accessible.
Then, click on the Generate a new API token button. The generated token is your Private key. You will need this in the following step.
3. Configure your template destination
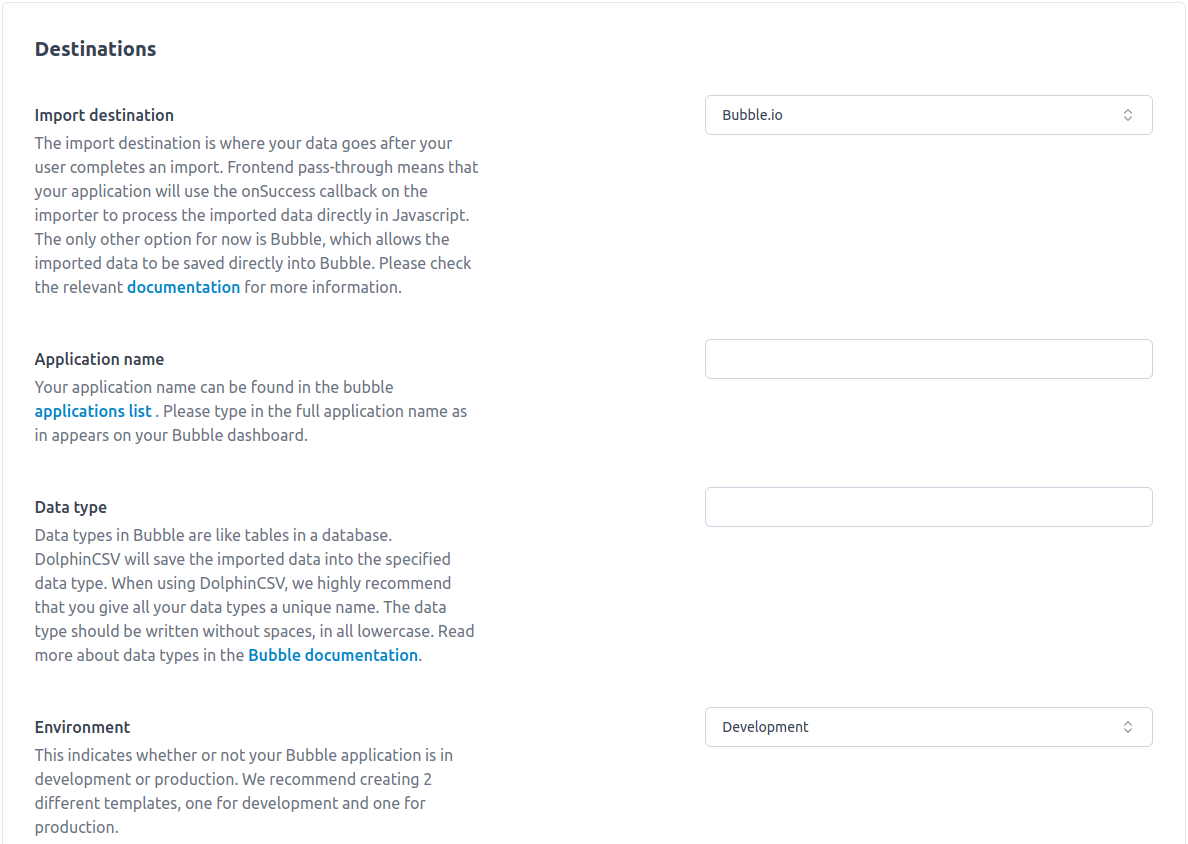
Go to your templates page, and click on the template that you want to integrate with Bubble. Then, click on the settings tab. You should see a section called Destinations, and a dropdown field called Import destination.
To set up your template to integrate with Bubble, select Bubble.io as the import destination.
You will then need to input in your application name, data type, environment, private key, and any custom domains you've configured.

4. Install the DolphinCSV plugin from Bubble
Next, you need to install the DolphinCSV plugin. Visit the plugin page and click install.
5. Configure the DolphinCSV plugin
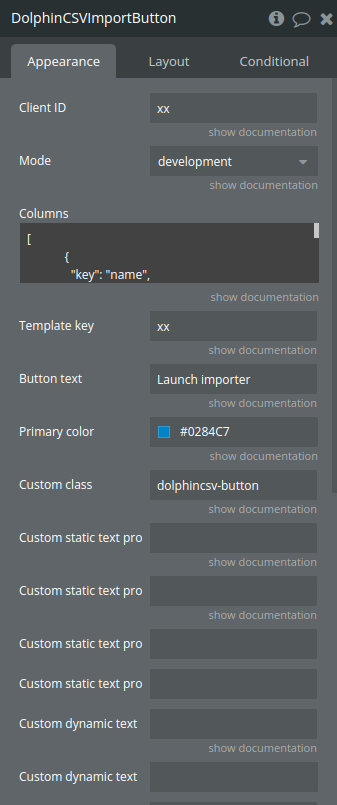
After installing the plugin, you will then see a new element in your Bubble editor: the DolphinCSV Import Button. Drag that button into your page.
You will then see the following plugin configuration options:

Client ID
You can find your Client ID in the credentials tab in your template details page.
Mode
Either development or production. Development will not count towards your import usage but only 10 rows will be imported.
Columns
If you want to override the columns defined in your template, specify the columns here. Otherwise, leave this field as [] and configure your columns from the dashboard.
If you're overriding columns, make sure the string you pass into the columns plugin properties is correctly formatted as JSON. This means that all property names must use double quotation marks, and there should be no trailing commas.
Bad:
[
  {
    internal_ref: 'name',
    label: 'Name',
    type: 'text',
    required: true,
  },
  {
    internal_ref: 'age',
    label: 'Age',
    type: 'number',
    required: true,
  },
]
Good:
[
  {
    "internal_ref": "name",
    "label": "Name",
    "type": "text",
    "required": true
  },
  {
    "internal_ref": "age",
    "label": "Age",
    "type": "number",
    "required": true
  }
]
Template key
You can find your template key in your template details page. It's right below your template name.
Button text
You can use this to customize the text of the button to launch the DolphinCSV importer. The default value is "Launch importer".
Primary color
You can specify the primary color to use for the importer. This will be used as a basis to style the overall look of the importer.
This feature is only available to Standard or Professional users.
Custom class
Use this to apply custom styling to the DolphinCSV Import Button.
Custom dynamic text properties
When your users import data, you will want to associate the imported data with that user. So for example, if [email protected] uploads a CSV filled with Product data, you would want to record the fact that those products belong to John.
To do that, you have to ensure that there is a field in your Data Type that lets you store this information. Maybe you want to store John's email address in your products Data Type. Then, you need to tell DolphinCSV that the products John uploaded should be associated with his email address.
To do this, you can use the custom static/dynamic text properties available in the importer.
The custom dynamic text property name field lets you set the Name of the field. In the above example, you would set it to email.
Then, you would set the custom dynamic text property value field to a dynamic value of Current User's email.
This means, whenever John uploads products through the DolphinCSV importer, the uploaded products will also have its email property set to [email protected]. This lets other parts of your application know who each product belongs to.
Following the example above, instead of a product being saved as:
{
  "product_name": "Ergonomic chair",
  "price": 300
}
It would be saved as:
{
  "product_name": "Ergonomic chair",
  "price": 300,
  "email": "[email protected]"
}
Even if the user never explicitly uploaded an email column.
Custom static text properties
In addition to the dynamic properties described above, you can also set static properties, in case you want all imports from a particular template to have a specific data.
6. Test the importer
Once you've set everything up, preview your Bubble application and the DolphinCSV Import button should show up. Click on the button and the importer will launch!
If you have any questions about integrating with Bubble, feel free to use the chat button in our website. We typically reply in a few minutes.